This guide will show you how to use Realtime Landscaping Photo.
First, take a picture of the area you want to landscape using your cellphone or digital camera. For best results, do this when the sun is behind you and try to keep the camera as level as possible.

Next, upload the photo to your computer using directions provided with your camera.
When you first start the program, this welcome menu will appear:

To import a photo, click Start a New Design using the Wizard. The following dialog box will appear:

Click Next to continue, and you will then be prompted to select the type of picture you want to import. Select Background Photo, and then click Next.

Select the image you would like to use, and then click Open. If this is the desired image, click Next, or click Select Picture if you wish to choose another image.

You will then be prompted to enter the file name you want to use for your imported picture. Click Set File Name, enter your desired file name, and then click Next.

This wizard will make a copy of your picture. If you change the original, you can reimport it using this wizard. Click Finish, to import your picture and complete the wizard.

The background will change to the picture you just imported. Your photo is now ready to be landscaped.
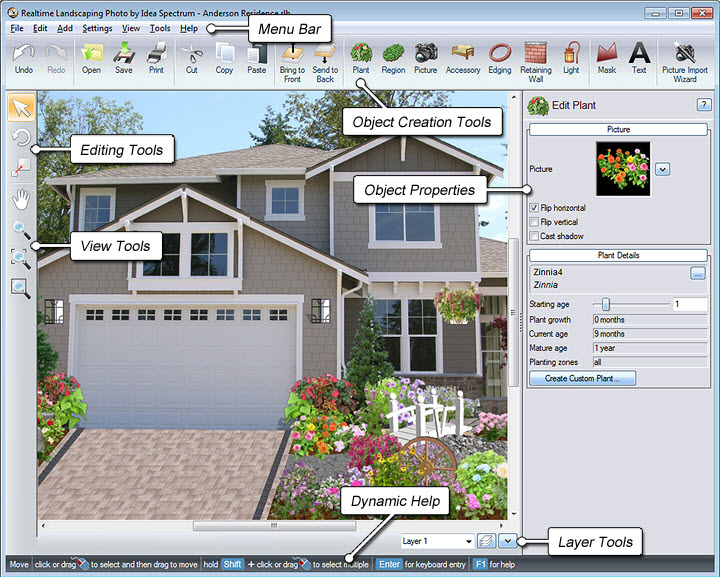
The picture below shows the Realtime Landscaping Photo interface with each section labeled.
Rotate the Middle mouse wheel to zoom in and out, and hold it down to pan. You may also use the Zoom and Pan tools located on the toolbar on the left-hand side of your screen.
To add grass, click the Region button. Left click to place points to create the outline of your region, then Right click to place the last point.

Select the following image in the Object Properties panel, to take you to a variety of different materials:

A dialog box will appear with different region fill materials. Select Grass, make your selection from the different options offered, and then click OK.

To further edit the look of the material, you can use the options found in the Object Properties panel.
To add a flowerbed, click the Region button again to create the outline. Left click to place points, and Right click to place the last point. Select the following image to change the material for your flowerbed:

Once the dialog box appears, select Ground, make your selection from the variety of options, and then click OK.

To further edit the material, you can use the options found in the Object Properties panel.
To add edging to your flowerbed, click Edging. Left click to place points, then Right click to place the last point.

Next, we will adjust the edging, so that it follows the curve of your flowerbed. To select all the points in your edging, Left click and drag to highlight the points. You will notice that your selected points will appear red in color, while unselected points will appear yellow. You can also select multiple points by holding down theShift key on the keyboard, then Left clicking the points you wish to edit. Click Edit Points and select Spline to match the curve to your flowerbed.

Click the material image if you wish to change the material of your edging, as seen in the image below.

You will then be able to choose from a variety of different edging materials, including some from National brands Belgard, Eldorado Stone, R.I. Lampus, and Unilock. Make your selection, and then click OK.

To further edit the edging, you can use the options found in the Object Properties panel.
To add a plant to your landscape design, click the Plant button.

Next, click the following plant image and it will take you to a large selection of different plants.

A dialog box with a large variety of plants will appear. To easily find a specific plant, you can click the Search option. You can search by common or botanical name, as well as type and planting zone. Enter the name of the plant, then click Search. Make your selection, and then click OK.

Left click to place your plant. To adjust the plant size, Left click and hold the green box found at the corner of your selection. To rotate, do the same with the green circle.

Here is the landscape design after more plants have been added:

To add 3D objects, such as cars, fencing or furniture, click the Accessory button.

You can choose from a large selection of different accessories. Make your selection, and then click OK.

Next, Left click to place the accessory, then adjust it’s size and rotation as desired. You can use the following options to help it match the perspective of your photo:

By default, objects are drawn in the order that you added them, but that is easy to change. For example, if you want this plant to appear in front of the planter, select the plant and click the Bring to Front button. You can also change the drawing order in small increments by pressing the F and B keys on the keyboard repeatedly.

When you are finished with your design, you can either print it, or export it as a JPEG or PDF file. Anything extending into the gray area will not be printed. Here is the completed landscape design.

Thank you for reading this guide, and please feel free to contact us for more information about our landscaping software.