Picture Import Wizard
The Picture Import Wizard is used to import photographs of plants, animals, and other objects. Photographs of materials such as grass, mulch, and brick can also be imported.
To begin, download a picture online or take a picture using your phone or digital camera. If you use a phone or digital camera, be sure to transfer the image from the camera to the computer before attempting to import the image.
If necessary, edit the image using the included Realtime Picture Editor application or any other photo editing program, such as Photoshop, Paint Shop Pro, or GIMP.
Follow the steps below to import a picture into Realtime Landscaping.
To import a picture:
- From the Tools menu, click Picture Import Wizard.
- Click Next.
- Select the type of picture you would like to import and click Next. Select Region for general-purpose materials such as bricks, grass, and mulch.
- Select the picture you would like to import and click Open.
- A preview of your picture will appear. Click Next.
- Click the Set File Name button to enter a different name for your picture, or just click Next if you want to use the original name. If you are importing a plant, the file name becomes the plant's common name.
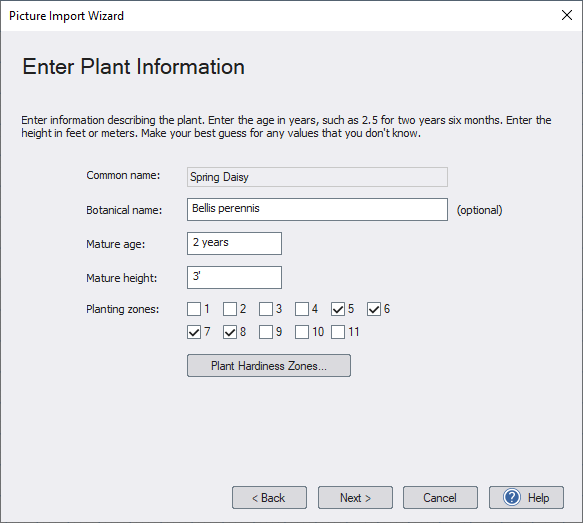
- If you are importing a plant, the following dialog will appear. Enter the desired information for your plant and then click Next. This information is optional, but we recommend entering accurate age and height information since this determines the plant's growth characteristics in your designs.
- Select any additional files you want to import (described below).
- Optionally enter the picture's real-world Width and Height (in inches or meters, not pixels). Leave these fields blank to use the default size of 3×3 ft (0.91×0.91 m). Click Next.
- Click Next, and then click Finish to complete the wizard.
The wizard will copy your picture to the following directory:
\Users\ user \Documents\Realtime Landscaping version \Custom Data\ type \Custom\
Where user is your Windows user name, version is the software version, and type is the type of picture you are importing (such as Plant or Region).
Important: Please make sure to follow any license requirements set by the author of the picture.
Importing Additional Files
Many downloadable material textures use Physically Based Rendering (PBR). A PBR material typically includes a Color (also called Albedo or Base Color) image plus optional texture maps that describe surface properties such as roughness, metallic areas, fine surface detail, and more. Importing these additional files can significantly improve realism - especially for close-up views and high-quality renders.
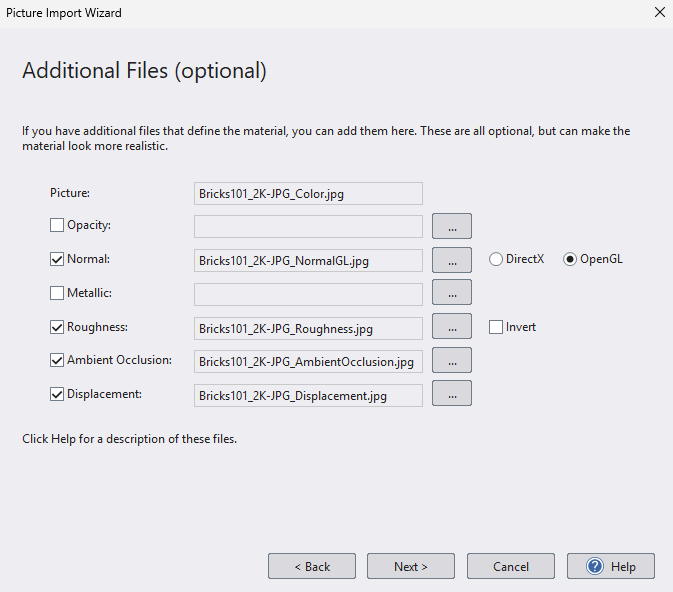
On the Additional Files page of the wizard, you can import these optional texture maps:
Supported texture maps
-
Opacity - Controls transparency (useful for cutout materials such as fences, grates, leaves, etc.).
-
Normal - Adds fine surface detail such as bumps and grooves without adding geometry.
-
Metallic - Specifies which parts of the material behave like metal.
-
Roughness - Controls how sharp or blurry reflections appear (lower = shinier, higher = more matte).
-
Ambient Occlusion - Adds subtle shadowing in crevices and recessed areas for extra depth.
-
Displacement - Adds height information that can simulate deeper surface variation.
Automatic file detection
If the additional texture files are located in the same folder as the main image, the wizard can often fill them in automatically. It does this by looking for common naming conventions used by popular texture libraries (such as polyhaven.com or ambientcg.com).
For example, a downloaded ambientCG texture set might include files like these:
-
Bricks101_2K-JPG_Color.jpg - The base color (no lighting or reflections).
-
Bricks101_2K-JPG_Roughness.jpg - Controls how matte or glossy the surface appears.
-
Bricks101_2K-JPG_NormalGL.jpg / Bricks101_2K-JPG_NormalDX.jpg - Surface detail (normal map).
-
Bricks101_2K-JPG_Metallic.jpg - Metallic areas (if applicable).
-
Bricks101_2K-JPG_AmbientOcclusion.jpg - Subtle crevice shading.
-
Bricks101_2K-JPG_Displacement.jpg - Height/displacement information.
If files are not detected
If the wizard does not automatically find your texture maps, you can still import them manually:
-
Click the browse button next to the map you want to add (for example, Roughness or Normal).
-
Select the corresponding file.
-
Repeat for any other maps you want to use.
All additional maps are optional - you can import just a Color image, or import a full PBR set for maximum realism.
Tips:
- When you import a picture, a copy of the picture is made and stored in a separate location. This means that if you delete the original picture, your designs will not be affected. However, if you make changes to the original picture, then you will need to run the Picture Import Wizard again.
- Once a picture has been imported, it can be edited using the Realtime Picture Editor. For example, the Picture Editor could be used to remove the background from a plant. For details, see Editing using the Realtime Picture Editor.
- When importing materials, such as pavers, color washes, bricks, grass, or mulch, the picture should be square if possible. For best results, we recommend using a resolution of 256x256 for small images, 512x512 for medium-size images, 1024x1024 for large images, or 2048x2048 for extra large images (such as trees).